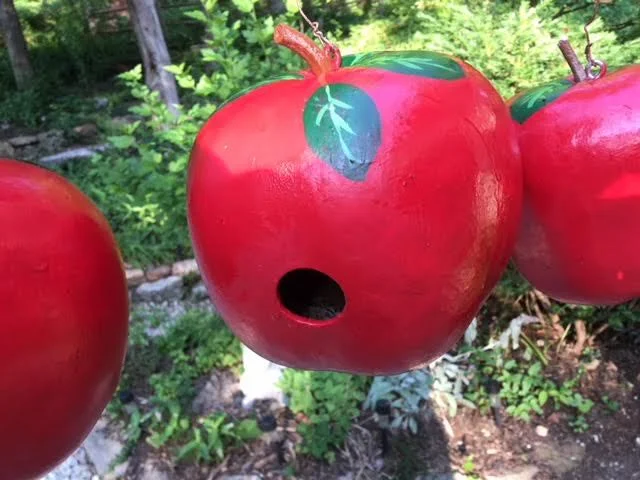
Painted Apple Gourd Birdhouses
/
Painted apple gourd birdhouses getting their last drying before hanging in trees. (Photo by Charlotte Ekker Wiggins)
Painted Apple Gourd Birdhouses
You are going to start seeing these gourds at local farmers markets late summer so I wanted to inspire you to think ahead. These gourds can make charming homemade gifts as hand painted birdhouses so this is how to make them into something simple: apples.
A friend gave these to me with the wren-size holes already drilled. I love wrens as well as the other birds that like the 1 1/4 inch hole entrance: tufted titmice and downy woodpeckers. If you want these birdhouses for other birds, check on what size entrance the specific bird likes. You can find a number of these guides online, here is one as an example:

The gourd will also need holes on the bottom to let any moisture drain. A simple drill bit 1/4 inch wide will do the trick.

Drilling holes in the bottom help the gourds stay dry. (Photo by Charlotte Ekker Wiggins)
Simple eye hooks securely screwed into the top will work to hang these gourds. I used copper wire from plant packaging to give the gourds a safe hanging wire.

Simple eye hooks into the top next to the stem make the gourds easy to hang. (Photo by Charlotte Ekker Wiggins)
Now paint the gourd with a good primer.
Once dry, add a coat of red. I used Valspar satin paint sample jar, cost around $2.50.
Once dry, I added two more coats, drying in between.

Green leaves on the top add dimension. (Photo by Charlotte Ekker Wiggins)
The green leaves where added free hand first in a solid satin dark green, those took two coats.
A lighter green gave the leaves some dimension.
The stems were painted brown; those took only one coat.
Once dry for a good 2 days, I finished by spraying with a clear plastic coat.

Painted gourds on a stick drying outside. (Photo by Charlotte Ekker Wiggins)

This gourd has a wider opening courtesy of a wintering mouse. (Photo by Charlotte Ekker Wiggins)
So two gourds will welcome wrens. The third one, with the wider opening courtesy of a wintering mouse, might be attractive to nutchatches or maybe a yellow bellied sapsucker.
Better yet, make a painted apple gourd to add to one of our songbird throws and you will have songbirds in hand.
Now wouldn't you like to get one of these as a gift for your garden?
Charlotte