Handmade Book Marks
/
A traditional metal heart book mark can be handmade as well as card book marks. (Photo by Charlotte Ekker Wiggins)
Handmade Book Marks
There is a current retail report showing there has been a shift away from E-books back to traditional books. I am not surprised. Even though I love my portable electronic book for traveling, I prefer a book in hand when I’m home, especially ones with lovely illustrations and photographs. Yes, that means gardening books although there are other topics that have similar appeal such as recipe books.
If you give books as gifts like the American Encyclopaedia of Cooking, or if you just need a simple thoughtful gift idea, try making handmade book marks. I have made and given them over the years and regardless of what books include them, the thank you notes I have received have been all about the simple handmade book marks that were included.
There are a couple of basic handmade book mark designs: the pop up book mark and the one that lies flat on the page. Regardless of the kind you make, you will need one basic ingredient: magnets. You can recycle some of those on your refrigerator as long as you have two that attach to each other or buy a roll of magnet strips that can be easily cut into pieces available at most craft stores.
Handmade Card Book Marks
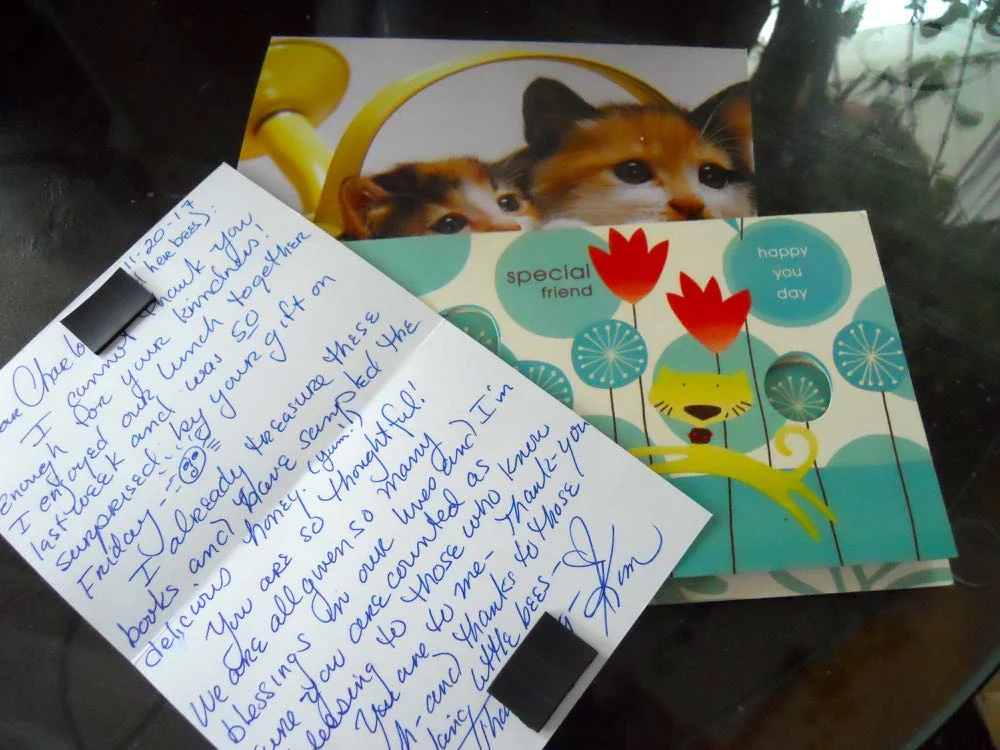
The easiest ones to make are the ones out of existing cards. Pick a card with a lovey sentiment you want to re-read, it’s a great way to repurpose thank you notes.

A roll of magnets that can be cut are easy to use. (Photo by Charlotte Ekker Wiggins)
Cut two pieces of magnets. Mine are about half an inch wide. You can cut them larger if you want more attaching power but be careful, if the magnets are too big they will tear the book page.
Once cut, remove the paper backing and attach to one side of the card. Add the second magnet piece to the first one; remove the paper backing and fold the card, that will ensure that the magnet pieces meet.
I leave the attached magnets in a book as a book mark to allow the glue to dry on the magnets.

Attach magnets to opposite sides inside the card. (Photo by Charlotte Ekker Wiggins)
That’s it. Once the magnets are dry, the card can nicely be used to mark the last page you read or a favorite page you want to read again.
You can also make your own cards, then attach the magnets for personalized gifts. As an avid reader, I would love to have a set of these I can easily tuck into my reading pile.
The thank you card now can easily be used as a book mark. (Photo by Charlotte Ekker Wiggins)
Handmade Pop Up Book Marks
These are a great Thanksgiving weekend project for kids of all ages. Kids can cut photos out of magazines, attach printed photos onto card stock and cut out designs from last year’s Christmas cards to make into handmade pop up book marks.
The one on the right was made out of a favorite little frog prince magnet.

See how handmade pop up book marks work as well as metal ones. (Photo by Charlotte Ekker Wiggins)
Once the designs are cut, glue the design to folded cardboard card stock so that the card stock fold will wrap around a book page.
For the frog prince, I glued the frog so that the tip of his crown sticks up over where the cardboard cart stock folds over. I also left some card stock at the bottom to demonstrate that would be a good place to add someone’s name; there is room inside for writing as well.

Cut the card stock to compliment the design. (Photo by Charlotte Ekker Wiggins)
Once the card stock was cut, I added once piece of the magnet under the top side. After leaving it to dry for a few minutes, I added the second magnet piece to the first one.

Add second magnet piece to the attached first one. (Photo by Charlotte Ekker Wiggins)
Remove the protective paper and fold the card back to the original shape so that the magnet strip will glue to the bottom piece.

Attached magnet pieces hold the book mark in place. (Photo by Charlotte Ekker Wiggins)
After allowing the magnet glue to dry, here it is, finished and ready for duty. If I wanted less card stock at the bottom, I could have applied the magnet strips to the bottom of the frog. I left the extra white card stock to demonstrate leaving space for adding a favorite saying or dedication.

My finished frog prince book mark where his crown will stick up over the book rim. (Photo by Charlotte Ekker Wiggins)
Can you see the possibilities now? Imagine what you can do after printing family photos. Fun to make and even better to give away!
Charlotte