How Fast Do We Ship

“Hi Charlotte, how fast do you ship your items? With the holidays I want to make sure what I buy will get here in time….” — Amanda

How Fast Do We Ship

Hi Amanda,

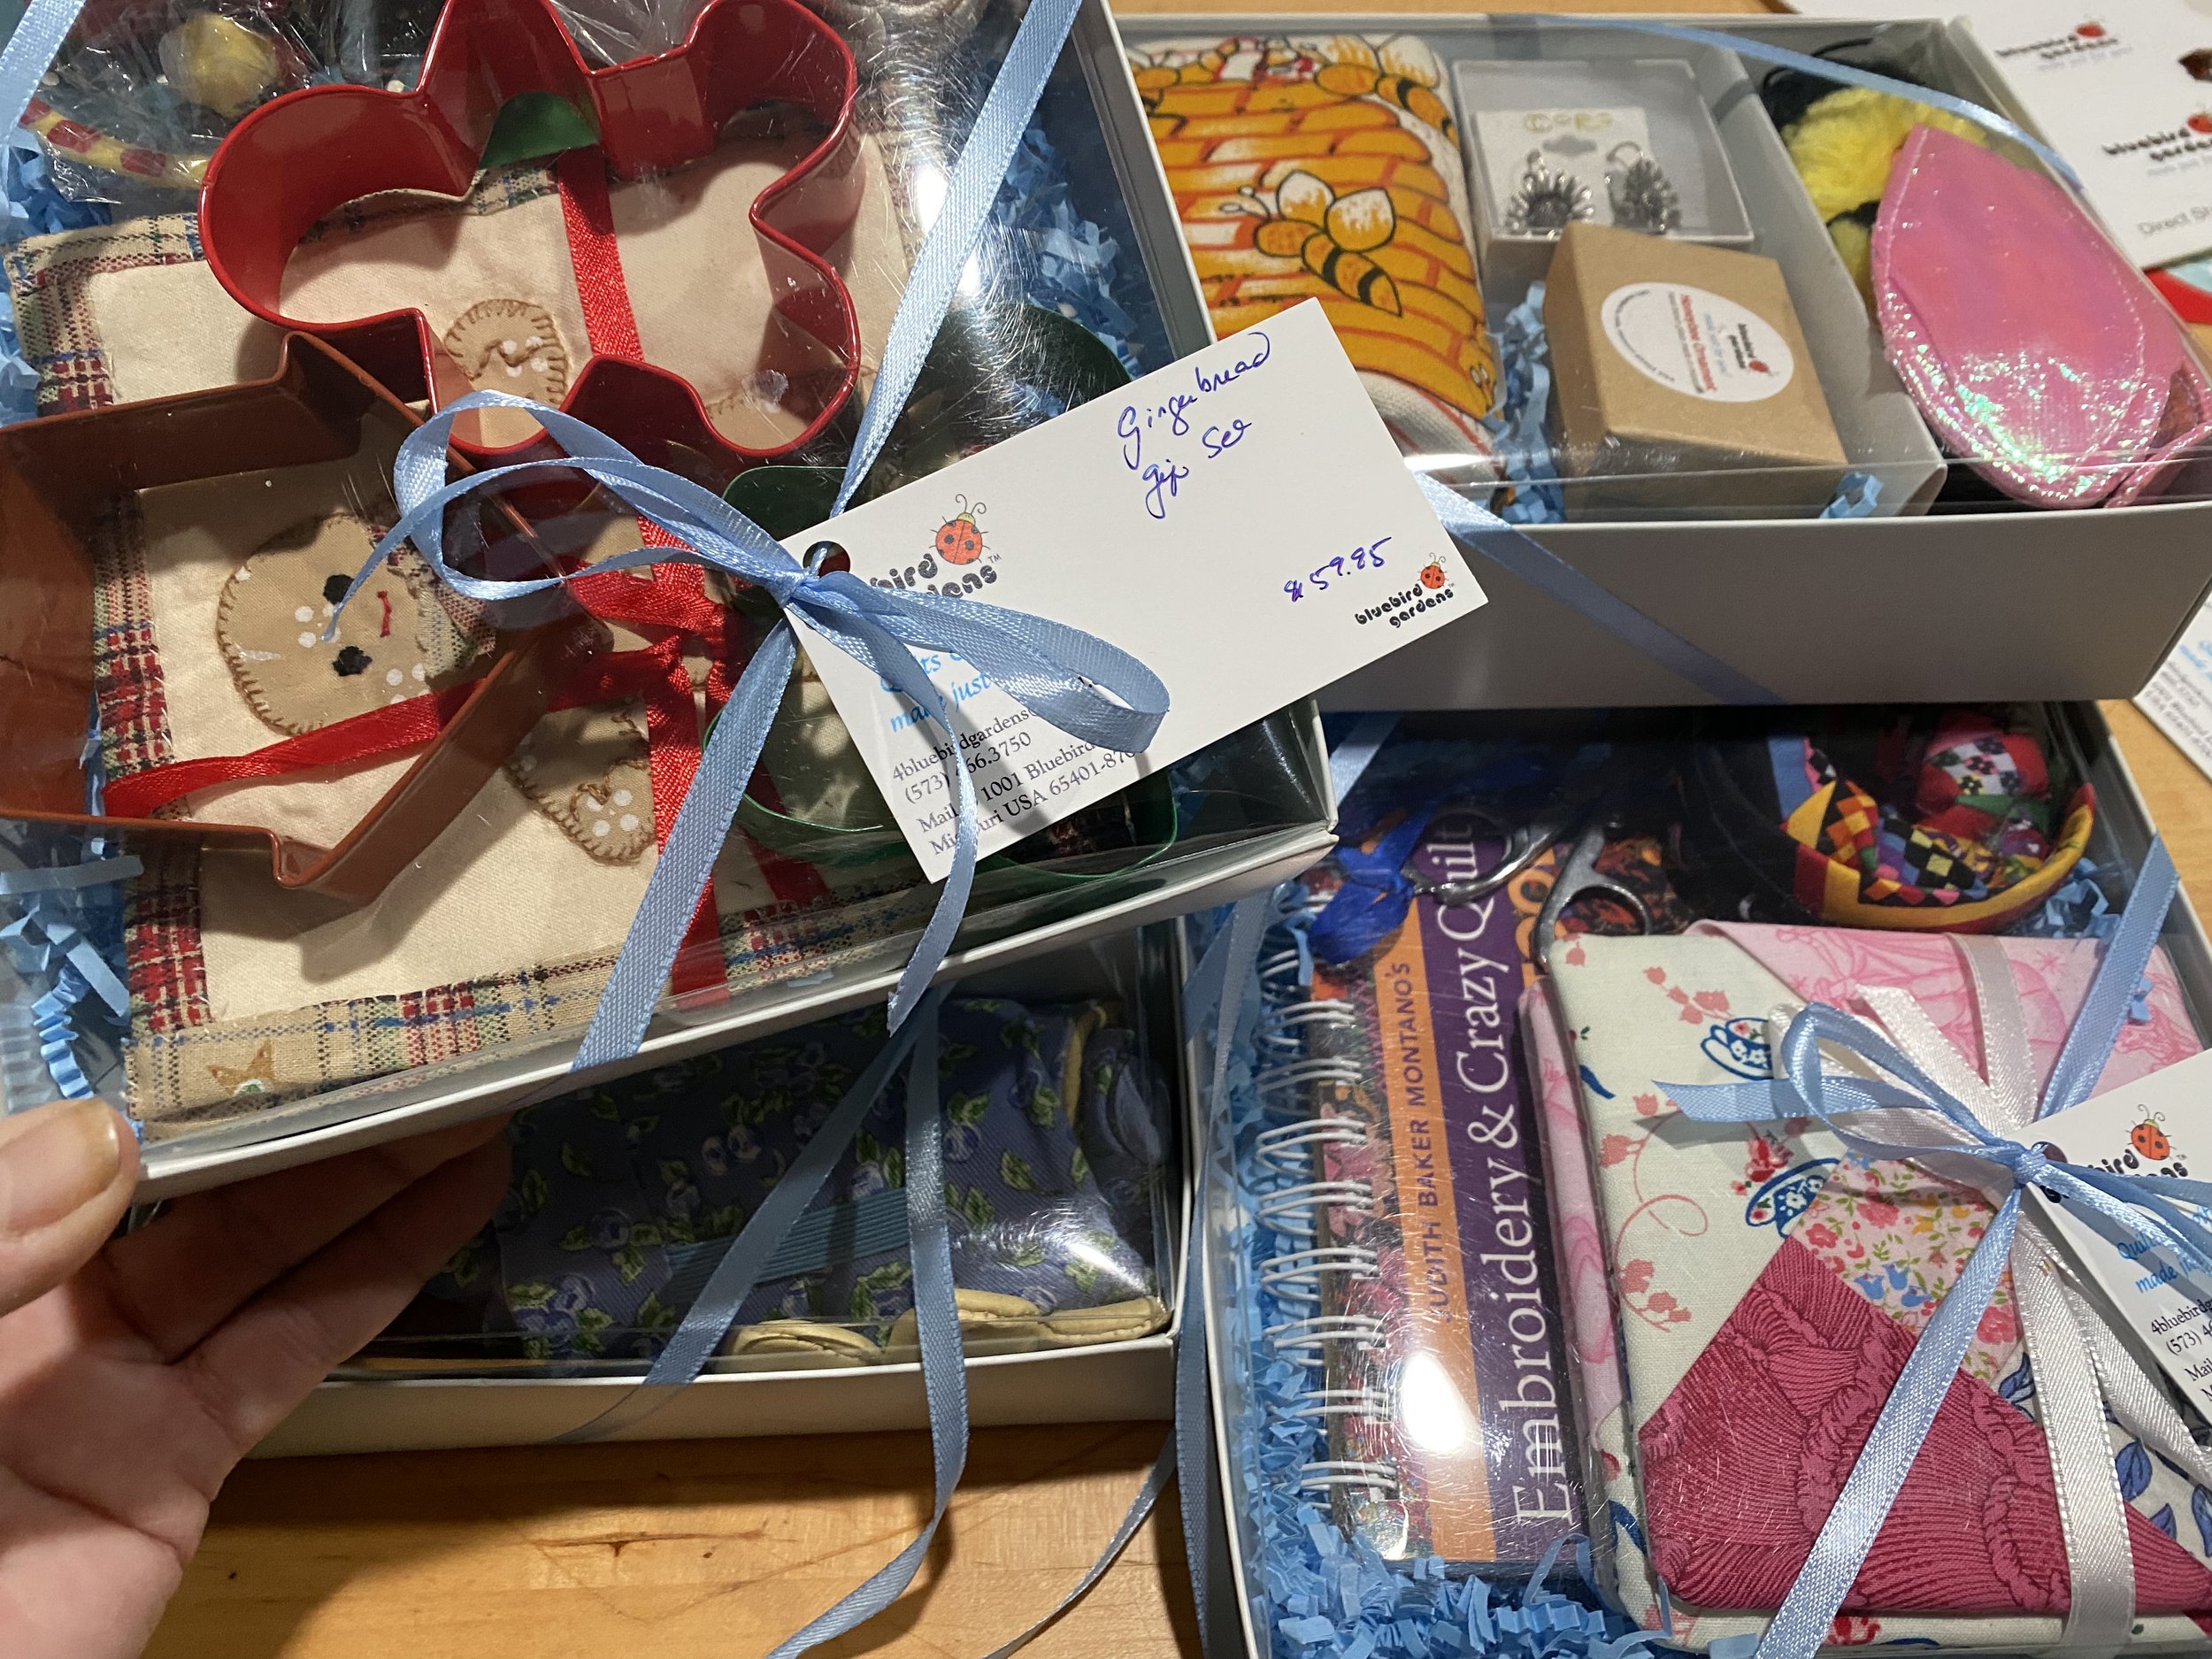
All items in stock ship within a day of being ordered. Quilts are shipped with a custom quilt care guide in our signature blue ribbon and tissue paper, and we include a free gift card if this is being shipped directly to the gift recipient.

We can also gift-wrap and ship quickly if you provide what you want on the free gift card. Frankly some of our shipments get delayed because the buyer is struggling with what to write on the gift card.

Once the box is in the mail, you get a tracking number so you can monitor where the item is. This time of year we suggest you plan to double the expecting shipping time so two-day priority mail is closer to 4 days and so forth.

We’ve had several customers thank us for packaging items simply “not wasting extra gift-wrapping” so if you want your item opened on a specific date we can also put that on the outside of the shipped box. No guarantee that the gift recipient won’t peek but we don’t make it easy.

Gift quilt wrapped in our signature blue tissue paper. (Photo by Charlotte Ekker Wiggins)

If you have something specific you want included, let us know and I will do our best to help you.

Charlotte

Using Dried Hydrangeas

Dried hydrangeas hiding light strings on top of kitchen cabinets. (Photo by Charlotte Ekker Wiggins)

“Charlotte I have several hydrangea bushes and love the idea of drying the flowers but how do you use them? I don’t have a lot of space…” — Sam

Using Dried Hydrangeas

Hi Sam,

If I had to pick only one dried flower to have, it would be hydrangeas. Not only are they sturdy after drying but with a little care you can save them in different colors from white to blue.

One of the best ways to use dried hydrangeas is in those room corners where you want something green and floral but there is no light to use something growing in a pot.

These dried hydrangeas brighten up a small bathroom corner. (Photo by Charlotte Ekker Wiggins)

They also come in handy potted for a dash of color on a front porch; from a distance they look like fresh flowers.

Recently I had enough dried hydrangeas that I could use them to update my kitchen and cover light strings and electrical plug ins at the corner of my kitchen cabinets.

For years I had these silk grapevine arrangements at the kitchen cabinet corners to cover the plug-ins. They sure look dated, don’t they.

These silk grape leaves have been hiding cabinet lights on top of kitchen cabinets. (Photo by Charlotte Ekker Wiggins)

They were okay for awhile until I found these baskets and had a better idea. No, the baskets don’t all match, the trick is to know the maximum height for the space. The trick will be fitting the dried hydrangeas into the baskets to allow for some clearance at the top.

Baskets don’t need to be exact, just the right height. (Photo by Charlotte Ekker Wiggins)

Once the hydrangea flowers were dry, I sprayed them lightly with a clear acrylic spray to cut down on dried hydrangea flowers dropping. As they continue to dry, the flowers become brittle and have a tendency to fall apart if they don’t get a little help to be preserved.

A light coating of a clear acrylic helps preserve the flowers. (Photo by Charlotte Ekker Wiggins)

Depending on the size of the basket, one large dried hydrangea flower head was enough so I gave them a try.

Dried hydrangeas in baskets at kitchen cabinet corners. (Photo by Charlotte Ekker Wiggins)

I will trim the stems a little more to lower the flower heads into the baskets.

Now in two cabinet corners, the electrical plug-in sockets stick out from the kitchen cabinet. Don’t even get my handyman started on those outlets, the first time he saw those he said “who in their right mind would have put them there??”

Good question.

And an even better question was how do I hide them.

These electrical plug-ins should have been installed more to the left. (Photo by Charlotte Ekker Wiggins)

I tried a number of options from larger lower baskets full of dried hydrangea flowers to suggesting to my handyman if he could move those. He will add it to his (very long so far) to do list.

In the meantime, I let one of the dried hydrangea flowers “fall” out of a basket.

A dried hydrangea out of the basket helps to nicely finish off this corner. (Photo by Charlotte Ekker Wiggins)

Now when I come into the kitchen and turn on the lights, I don’t see the light strings or those unsightly plug-ins.

Hope this inspires you to think of other ways to use dried hydrangeas around your home!

Charlotte

How Much Fabric for Queen Quilt

Cotton fabrics come in a variety of widths from 45 inches to 60 inches wide. (Photo by Charlotte Ekker Wiggins)

Cotton fabrics come in a variety of widths from 45 inches to 60 inches wide. (Photo by Charlotte Ekker Wiggins)

“Hi, hope you can help me. How much fabric do I need for a queen size quilt I’m going to have someone make me?” - Caller from Cuba, Mo.

How Much Fabric for Queen Quilt

Hi, depends on what quilt pattern you are using, what type of fabric you plan to use and who is making your queen quilt.

In general, a standard queen size quilt is 90x90 inches. We make our custom handmade quilts a tad larger, 95x95 inches to make sure the sides of the mattresses are covered by the handmade quilt.

If you are just wanting a solid fabric queen handmade quilt, remember fabrics come in 45” and 60” widths. You also need an extra 4” around the edges to allow for machine quilting.

In addition, if you are using a printed fabric, any fabrics that have patterns need to be matched across the quilt and that will require additional fabric.

For example, if you are buying 45” solid fabric, you will need 8 yds.

If you want the binding to be the same color, or even if you want a different color, that will be 2 yds of 45 inch fabric.

Then the backing is another place you will need fabric. You can find white fabric in 100” and 110” lengths specifically made for handmade quilt backing or you can add a different fabric on the back to make the custom quilt reversible. I personally like the idea of using something more than white fabric on the back so that one has two home decor looks with one custom handmade quilt.

If you are making this queen handmade quilt with a pattern, the pattern may require different lengths of various fabrics.

Finally, how much fabric is used also depends on the experience of the quilter. More experienced quilters have a better feel for working with the fabric lengths than beginning quilters do. My best advice is call the person who is going to make the quilt for you to get your fabric measurements.

Charlotte

My Favorite Quilt

Etta Girl models my current favorite quilt, one with a beehive. (Photo by Charlotte Ekker Wiggins)

Etta Girl models my current favorite quilt, one with a beehive. (Photo by Charlotte Ekker Wiggins)

“Charlotte you have so many beautiful quilts. May I ask what is currently on your bed?” - Alissa

My Favorite Quilt

Hi Alissa,

Thanks, adding a quilt to a bed is the easiest way to update the look of a room and I should have one of the best-dressed bedrooms around!

I do have several favorite handmade quilts depending on the season. And sometimes my mood at the time. A bright quilt can lift my spirits and a fun quilt can match my mood at the time.

Right now the handmade quilt on my bed is Bees in Garden quilt. This is a busy time for beekeepers so the quilt reminds me of the industrious girls outside working my garden.

I’ve also put this handmade quilt on my bed in the middle of winter to warm up my bedroom and remind me of the warmer days ahead.

The quilt model, by the way, is one of two rescues I found abandoned on a county road Memorial Day weekend 2020 when I was catching a bee swarm. The bees didn’t stay but the cats did!

Charlotte

Where to Put Flowers in Your House

One of my favorite spots for fresh flowers, the main level bathroom. (Photo by Charlotte Ekker Wiggins)

One of my favorite spots for fresh flowers, the main level bathroom. (Photo by Charlotte Ekker Wiggins)

“Charlotte I love all of your flower arrangement ideas but I’m not sure where to add them in my house. How do you decide where they should go??” — Tania

Where to Put Flowers in Your House

Hi Tania, glad you enjoy the flower arranging ideas, it’s one of the ways to keep enjoying a garden by bringing flowers inside.

Actually your question is a very good one. If you’ve never brought flowers regularly inside, there are several things to consider:

  1. Do you have pets? You may want to keep the flowers away since some flowers can be toxic.

  2. Do you have small children? Same thing here, you want to keep your breakable flower vases, and the flowers, away from little curious hands.

Now where do you spend most of your time in the house? Usually we all spend daily time in kitchens, bathrooms and bedrooms. And for those of us who work from home, we also have an “office space” or somewhere in the house we use as a work space.

Most discussions about flower arranging center on those huge flower collections that sit in the center of a table. Lovely, to be sure, but not practical if you want to have them close to where you are spending time. As a matter of fact, I prefer lower sitting flowers on my dining room table for dinners so I can see the person on the other side.

So scope out where you would like to have flowers and then find a vase that will fit that space. You can find some lovely flower bases at thrift and consignment stores. I probably - well, not probably, I do have a lot of small vases. I change them out when I put in a new flower arrangement. I also like to have options on the flower vase shapes - long skinny ones for that one single rose or flower, short round vases when I make little bouquets.

If I have only one flower vase to add, I put it where I am working and can easily see it. Nothing quite cheers me up as a small bouquet of flowers.

These peonies have opened from buds in my main floor bathroom. (Photo by Charlotte Ekker Wiggins)

These peonies have opened from buds in my main floor bathroom. (Photo by Charlotte Ekker Wiggins)

And here I go showing you the exact opposite, a tall flower vase. Which only goes to show you that the vase needs to match the space.

My second favorite spot may be a surprise but it’s my main floor bathroom. Especially if the flowers are scented, a bouquet will turn that small room into a lovely haven. But as you can see, to even see the flowers the vase needs to be tall and skinny so that it fits in the corner.

Next is my kitchen, where I keep a little space next to my center island for flowers. Since I sometimes use the island as a desk, I consider that an annex office.

Finally if I have extra flowers I will take a bouquet up to my bedroom, especially if I’m going to spend time reading or doing laundry. Since I have inquisitive cats, I have to be careful where I place them but it is a special treat when I do.

Now a few dont’s. Don’t place the flowers on top of a TV or a warm spot, that will dry them out. Don’t tear your flowers when picking them, cut them so you don’t damage the stems. And don’t bring in visitors, gently shake your flowers to dislodge any bugs that may be in them.

Once you scope out the spaces and have appropriate sized vases, the rest is the fun of cutting garden flowers and bringing them inside.

Remember to change the water every other day, that will help keep the flowers lasting longer in the vases and compost the dead flowers. The compost will keep giving you more flowers!

Charlotte

Mixing Daffodils with Other Flowers

IMG_1385.jpeg

“Charlotte I heard you’re not supposed to mix daffodils with other flowers so how do I mix them in a bouquet?” - Paula

Mixing Daffodils with Other Flowers

Hi Paula,

When I want to mix daffodils with other flowers, I leave the daffodils in a flower vase by themselves for a good day or so. That way the toxins daffodils have will leach out so they don’t impact the other flowers.

I also make flower bouquets without mixing the flowers. I keep each flower type in their own flower vase and group them together so I can still enjoy them mixed but without impacting each other. This is also an easier way to refresh the bouquets by removing those flowers that may die off sooner than other flowers. Iris, for example, may not bloom as long as some other cut flowers.

Charlotte

What Daffodils to Pick

IMG_0411.jpeg

“Charlotte, my first daffodils are in bloom this year. We planted them to add some color to our spring garden. I want to take a bouquet to my Mom. Which flowers do I pick?” — Monique

What Daffodils to Pick

Hi Monique,

Congratulations on getting your first daffodils, they add so much to a spring garden.

When picking daffodils out of a garden, don’t get the ones that are part of the landscape. (Photo by Charlotte Ekker Wiggins)

When picking daffodils out of a garden, don’t get the ones that are part of the landscape. (Photo by Charlotte Ekker Wiggins)

Since these are your first daffodils, you want to keep the majority for your daffodils that add to the landscape, especially those along paths and close to where you can see them.

When picking daffodils, pick those ones that are falling over. Those won’t stand back up once they fall over so you can clean up the landscape by removing them. While you are at it, also remove the spent daffodil blooms so the plant doesn’t spend energy making seeds.

Secondly, use an old paring knife or garden snips to remove the branches at the lowest point you can reach. Cutting will minimize the damage to the daffodil stems.

Any group of daffodils will make a pretty gift bouquet. (Photo by Charlotte Ekker Wiggins)

Any group of daffodils will make a pretty gift bouquet. (Photo by Charlotte Ekker Wiggins)

Finally place the daffodils in a jar full of water immediately after cutting them. Don’t worry if you have all of the same kind or not, I frankly think the mixed variety bouquets are more interesting.

If you plan to mix them with other flowers, let the daffodils sit in a separate jar of water for a good day or so. Daffodils have a toxic substance that will kill other mixed in flowers. After a day or so, you can pour out the water, give them fresh water and add other flowers to the daffodils.

Bet your Mom will love whatever bouquet you take her!

Charlotte

Encyclopedia of Classic Quilt Patterns

This is an excellent beginning quilting book with 101 classic patterns. (Photo by Charlotte Ekker Wiggins)

This is an excellent beginning quilting book with 101 classic patterns. (Photo by Charlotte Ekker Wiggins)

“Hi Charlotte, I really enjoy your blogs. With COVID i’ve been inspired to try putting some quilts together but I don’t know where to start. What do you suggest?” — Sylvia

Encyclopedia of Classic Quilt Patterns

Hi Sylvia,

What a great way to spend your time at home but let me warn you, this can be addicting.

One of the best reference books I’ve come across is the Encyclopedia of Classic Quilt Patterns. The book includes 101 of the classic patchwork quilt patterns from ninepatch to double wedding rings.

As you consider your options, do not start with a double wedding ring quilt, that is one of the most difficult patterns to make.

Usually people starting to quilt start with the ninepatch, a block that you will be surprised can take on many different looks with just the change of fabric.

I would also start with a table runner or place mats instead of a quilt so you can familiarize yourself with the sewing process. And whatever you make, make sure to sign and date it.

Charlotte

Re-Blooming Christmas Cactus

This white Thanksgiving cactus is now blooming at Christmas. (Photo by Charlotte Ekker Wiggins)

This white Thanksgiving cactus is now blooming at Christmas. (Photo by Charlotte Ekker Wiggins)

“Help. My Christmas cactus is healthy but it’s not blooming, how do I get it to bloom?” -Ethel

Re-Blooming Christmas Cactus

Hi Ethel, if your plant has little spikes at the end of the leaves it is a Thanksgiving cactus, not a Christmas cactus.

Both of these plants are favorite plants for Christmas either as gifts or Christmas holiday decor like the Twelve Wishes lap quilt - I say they are excellent for both.

'“While these plants are indeed a cactus, it is actually a tropical plant that thrives in conditions that we do not usually associate with cactus,” said Patrick Byers, horticulture specialist with University of Missouri Extension.

If received as a gift, Christmas cactus should be placed in a sunny window. Avoid areas with hot drafts (heat vents, fireplaces) because that will cause the buds to drop. Find a window in a cooler room and the blossoms will hold longer.

While in bloom, water the plant when the top inch of the soil is dry.  Don’t overwater the plant.

When the blossoms drop, the plant begins a resting period. Keep the plant on the dry side, but water if the leaves shrivel. When new growth resumes, resume more frequent watering.

During the summer, a Christmas cactus will thrive outdoors, but be sure to place the plant in a shady or semi-shady spot.  Water as needed to keep the plant from shriveling.

Christmas cactus are short day plants. They set blossoms in response to long nights (12 hours of darkness) and short days.  This happens naturally in the fall.

Exposing a Christmas cactus to cool temperatures (50-55°F) will also encourage blossoming, so leave the plant outside as temperatures cool in the fall.  Bring the plant indoors gradually when temps get too cold, and keep in a cool, bright window.

Charlotte

Re-Blooming Amaryllis

These Amaryllis bulbs are reblooming at my house this year, see the bud? (Photo by Charlotte Ekker Wiggins)

These Amaryllis bulbs are reblooming at my house this year, see the bud? (Photo by Charlotte Ekker Wiggins)


”Charlotte help, I was gifted an Amaryllis bulb last year but I can’t seem to get it to re-bloom for Christmas. Is there a special trick?” - Amy

Re-Blooming Amaryllis

Hi Amy,

Congratulations on keeping your Amaryllis bulb alive for a year. Amaryllis may be the second most popular holiday gift plants behind Poinsettias and Thanksgiving cactus, often mislabelled as Christmas cactus. Although these are relatively easy bulbs to keep going, I know a number of people who killed theirs off after getting them for holiday gifts.

Amaryllis bulb leaves collecting sun and storing the energy in bulbs. (Photo by Charlotte Ekker Wiggins)

Amaryllis bulb leaves collecting sun and storing the energy in bulbs. (Photo by Charlotte Ekker Wiggins)

There is a “trick” to getting Amaryllis bulbs to re-bloom.

First, once they do bloom, you need to let the leaves grow. The leaves are solar collectors, gathering sunshine to store as energy in the bulbs. The leaves can remain on the bulb for many months. I still have a large pot of Amaryllis bulbs still growing leaves (see photo above)

Once the danger of frost is over late spring, I move my bulbs outside to a shady area so that they can continue to collect sunshine.

When the leaves die off on their own, here’s the second key step: don’t water for a couple of months.

I have removed the bulbs out of their pots and saved them in a brown bag. I have also just left them sit in their pots without getting watered so do whatever fits your schedule.

If you bag the bulbs, you can then re-pot and water for when you want them to bloom.

Regardless of whether in a bag or pot, check them periodically for any signs of growth.

If you leave them in pots, then start watering after 8 weeks of a dry spell.

I find it easier to leave mine in their pots. I will remove the bulbs and either repot in new soil or add soil to make sure only their roots are covered. You want the bulb to be sitting on top of the soil.

Make sure your potted Amaryllis roots are covered in soil. (Photo by Charlotte Ekker Wiggins)

Make sure your potted Amaryllis roots are covered in soil. (Photo by Charlotte Ekker Wiggins)

As you re-grow your Amaryllis, you may see little shoots to the sides of the bulbs. Those are baby Amaryllis growing off the mother bulb.

I leave those for several years until they are at least one-inch wide before I remove the baby bulb and plant it on its own. Something to look forward to doing!

This little side growth is a new Amaryllis bulb. (Photo by Charlotte Ekker Wiggins)

This little side growth is a new Amaryllis bulb. (Photo by Charlotte Ekker Wiggins)

Now not all Amaryllis bulbs will re-bloom the first year. If when you water your bulb and you only get leaves, that means the bulb did not collect enough energy to re-bloom.

Don’t get discouraged. Give your bulb water with fertilizer and place in indirect sun so the leaves can help rebuild the stored bulb energy. Once the leaves die off, let the bulbs rest for a couple of months and start to water.

These Amaryllis bulbs are growing again but not re-blooming, they need to collect more sun. (Photo by Charlotte Ekker Wiggins)

These Amaryllis bulbs are growing again but not re-blooming, they need to collect more sun. (Photo by Charlotte Ekker Wiggins)

So this year, this pot of 3 Apple Blossom Amaryllis may bloom around Christmas. I have them sitting in the pass through from my kitchen, where I’ve enjoyed watching them grow every day.

The tallest stem is 25 inches tall so I will be staking that shortly. Once the flowers bloom, they may cause the stem to bend with their weight.

Apple Blossom Amaryllis bulbs getting ready to bloom (Photo by Charlotte Ekker Wiggins)

Apple Blossom Amaryllis bulbs getting ready to bloom (Photo by Charlotte Ekker Wiggins)

All three bulbs have buds now so these three Amaryllis bulbs were able to collect enough energy to re-bloom.

And so what’s all the fuss about?

Take a look at what these Amaryllis bulbs look in bloom.

Amaryllis Apple Blossom in bloom, these flowers can be 12 inches wide. (Photo by Charlotte Ekker Wiggins)

Amaryllis Apple Blossom in bloom, these flowers can be 12 inches wide. (Photo by Charlotte Ekker Wiggins)

Amaryllis bulbs come in a variety of colors and shapes. The more common ones are Lions King and Apple Blossom, which I personally like.

Lovely way to celebrate the holidays!

Charlotte

Custom Book Marks

IMG_6811.JPG

“Hi Charlotte, I saw your post on making custom book marks but I can’t get my cards to face in the right direction. What am I doing wrong?'“ - Sally

Custom Book Marks

Hi Sally, actually nothing, it’s in how and where you place the book mark - I mean, card.

Place the book mark card on the page where you want to start reading next. (Photo by Charlotte Ekker Wiggins)

Place the book mark card on the page where you want to start reading next. (Photo by Charlotte Ekker Wiggins)

So the traditional cards that open left to right work quite well, you want the book mark front to be on the page where you want to start reading.

You may see the back of the card at first. That will tell the reader they are close to the page where they left off reading.

IMG_6813.JPG

If you have a card that you want to use as a right side book mark, you can cut the card and use clear tape to seal it back together so that it opens on the left side. When I have done that, I have used several layers of tape or, better yet, added a cardboard binding so the folds won’t wear down with use.

If you make your own custom book marks you can make them opening left, right and even folding over the page top, depending on what designs you have. I have one from a card one of my customers sent me, it's a charming pencil design by her 6-year old daughter.

This is another great gift idea kids can make. Cut the book marks the same sizes and have the kids color designs. Place the book mark set in a box and there you have a lovely stocking stuffer or gift.

In case you can’t find the magnet tape to cut, you can get that from most arts and crafts stores online.

I keep a collection of favorite cards and thank you notes with attached magnets ready for deployment when I need them. Some have been around for many years, reminding me of the person who sent the card and the reason. It’s not only a good recycling practice but a way to be reminded of the gratitude we’ve enjoyed over the years.

Charlotte

Thanksgiving Cactus

One of my Thanksgiving cactus is blooming a bit early this year. (Photo by Charlotte Ekker Wiggins)

One of my Thanksgiving cactus is blooming a bit early this year. (Photo by Charlotte Ekker Wiggins)

“…I’m confused, I thought I had a Christmas cactus but you said it was a Thanksgiving cactus. Are they different?” —Tanya

Thanksgiving Cactus

Hi Tanya,

Yes there is definitely a difference between Thanksgiving cactus and Christmas cactus. They both come from the same plant family but Christmas cactus are no longer available on the commercial market.

Schlumbergera truncata is the Thanksgiving cactus. It is called a leaf cactus but is not a true cactus. Rather it is an epiphyte, which are plants that live on other plants.

The main difference between Thanksgiving cactus and Christmas cactus is that Thanksgiving cactus leaves are broad and flat with slight horns on the edges. Christmas cactus leaves tend to be thinner and have smooth edges.

Thanksgiving cactus can be encouraged to bloom at Thanksgiving. (Photo by Charlotte Ekker Wiggins)

Thanksgiving cactus can be encouraged to bloom at Thanksgiving. (Photo by Charlotte Ekker Wiggins)

Thanksgiving cactus flowers are very similar to fuchsia blossoms. They are available in a rainbow of colors including yellow, white, pink, peach and red.

The Thanksgiving cactus is a favorite home decor plant. Not only is it easy to care for but the blooms may last 2-4 months.

To bloom at Thanksgiving, Thanksgiving cactus have to be exposed to less light and colder temperatures at the end of summer or early fall.

Some of mine live in the basement so they were naturally exposed to colder temperatures thanks to air conditioning and less light. The sure sign the plant is about to bloom is the sight o little colorful bumps at the ends of the green leaves.

Thanksgiving cactus have spikes or horns at the ends of their leaves. (Photo by Charlotte Ekker Wiggins)

Thanksgiving cactus have spikes or horns at the ends of their leaves. (Photo by Charlotte Ekker Wiggins)

You will find a good selection of Thanksgiving cactuses to buy from November-January.

Charlotte

Can Iris Be Cut?

Yellow iris growing along my old cedar fence. (Photo by Charlotte Ekker Wiggins)

Yellow iris growing along my old cedar fence. (Photo by Charlotte Ekker Wiggins)

“…I am in love with some of your beautiful iris. Question can they be cut and used in (flower) vases?” — Amanda

Can Iris Be Cut?

Hi Amanda, yes irises can be cut and used in flower vases. They don’t last as long as some other cut flowers but they certainly add some drama to any bouquet.

One of the ways you can keep them longer in a flower vase is to refresh the bottom stem cut and replace the water in the vase.

Here are two iris stems I cut a day ago and placed in a flower vase in my kitchen. All iris flowers are in bud form.

Cut iris in a flower vase in my kitchen. Let’s see how long it takes for them to open. (Photo by Charlotte Ekker Wiggins)

Cut iris in a flower vase in my kitchen. Let’s see how long it takes for them to open. (Photo by Charlotte Ekker Wiggins)

That was mid-afternoon the day before. The next morning, this is what I found blooming in my kitchen:

Cut iris stems are now in water in a vase getting ready to bloom. (Photo by Charlotte Ekker Wiggins)

Cut iris stems are now in water in a vase getting ready to bloom. (Photo by Charlotte Ekker Wiggins)

The flowers tend to last 1-3 days depending on how warm the room is. I don’t know who has enough room in a refrigerator to store them overnight but a florist friend told me they can last longer kept in a cooler environment.

We’ve had record cold temperature early May in Missouri but I suppose I could have placed them outside overnight. The temperatures have averaged around 45F evenings.

After 3 days, these iris started to fade. (Photo by Charlotte Ekker Wiggins)

After 3 days, these iris started to fade. (Photo by Charlotte Ekker Wiggins)

Once they start to fade, I cut off the spent flowers so that they don’t detract from the rest of the buds.

If you have irises you enjoy, definitely bring a stem or two inside, place in water and enjoy!

Charlotte

Modern Shadow Boxes

One of the modern shadow boxes I use to feature favorite books. (Photo by Charlotte Ekker Wiggins)

One of the modern shadow boxes I use to feature favorite books. (Photo by Charlotte Ekker Wiggins)

“….your post on repurposing a vintage or antique shadow box. I like more modern-looking pieces. Are there modern shadow boxes?” — Sarah

Modern Shadow Boxes

Hi Sarah, there sure are more “modern” shadow boxes, check any of your local hobby shops in the photo frames section. Depending on what you want to place in the shadow box, make sure you pick one up that has the depth you need for the item you want to add.

The white modern shadow box in this photo was a thrift store find so also have fun treasure-hunting. It will be easier on your pocket book and you may find something interesting. If its not the color you want, that’s an easy enough fix, the key is to double check that the hinges and side latch are, first, working, and secondly easy to use.

Now a quick story about the book in this modern shadow box.

When I got married and added my husband’s last name to mine, people would periodically refer to me as “Mrs. Wiggins of the Cabbage Patch,” especially after I started writing weekly gardening columns in area newspapers. There was one column about rabbits in my garden that ramped up the use of the term, for obvious reasons.

Years after my divorce, I found this book at a local library sale and realized people had it wrong all along. It makes me smile every time I see the book so I have it hanging in my bedroom next to one of my book cases.

You don’t need to only feature books. Modern shadow boxes are a great way to highlight a special memento of some sort - pictures of a special event, a favorite watch, baby shoes - whatever will fit in it and brings a smile and good memory.

Let me know what you end up doing with your modern shadow box!

Charlotte

Help, I Need a Last Minute Gift

My favorite gift socks this year, ones that make our feet look like cat paws. (Photo by Charlotte Ekker Wiggins)

My favorite gift socks this year, ones that make our feet look like cat paws. (Photo by Charlotte Ekker Wiggins)

“I can’t believe I am saying this. I am terribly behind with Christmas shopping. Lots of colleagues but not a lot of money. Help, do you have a last minute gift idea?” — (Name withheld to protect the procrastinator)

I Need a Last Minute Gift!

Hi, you are not alone on either count - late shopping with a limited budget. Luckily I have a suggestion that may work quite well: socks.

Not just any socks, you may have to make a few trips to find good local sources. I am talking about soft, plush, warm socks. Some come in fun themes, too, and, if you can find them, the socks that look like dog and cat paws. Santa is bringing me a pair and I’m sharing them with close friends and family who have cats.

Socks can be practical and fun. When I used to lecture in a formal business suit, I would usually lighten things up with a pair of fun socks on my feet. I knew who the fun people were in the room when they would come up afterwards and admire my socks. Sometimes i wore them inside boots. No one else saw them but I knew they were there.

Wasn’t it George W. Bush who was known for his signature socks?

Examples of available gift socks from fleece and cat socks, left, to theme socks. (Photo by Charlotte Ekker Wiggins)

Examples of available gift socks from fleece and cat socks, left, to theme socks. (Photo by Charlotte Ekker Wiggins)

Now this may take a little doing this late in the season so I asked around. I am told the local chains of inexpensive items around a dollar may have some options. I happened to see quite a stash of new ones at our local Goodwill store earlier this month. And most department stores carry a few in the men’s and children’s department so be creative as you shop.

I have a pair of turquoise fleece socks someone gave me years ago that are still my go-to socks when I get cold. As some of us turn our thermostats down to conserve energy, having comfy socks are quite handy. Those came from the sporting goods section; I think they were camping socks.

Secondly, you can usually find them in an assortment of fun patterns so you can personalize them to match the recipient. A friend years ago gave me a whole set of theme socks marking favorite holidays she picked up at a naval-themed department store. Some of them are in the photo.

If all else fails, you can pick up soft socks and add small embroidered patches sewn on the side. Don’t pick up anything big, you want the socks to be comfortable, not scratchy.

Last but not least, you should be able to find marked down Christmas stockings the last few days before Christmas. Pick those up and add a favorite tube of hand lotion - better yet, make it foot lotion available at most drug stores.

Not a fancy idea, I know, but it is one that will keep on giving. Have fun shopping!

Charlotte


Mum Still Alive?

This is a typical mum given as a gift and then tossed once flowers die. (Photo by Charlotte Ekker Wiggins)

This is a typical mum given as a gift and then tossed once flowers die. (Photo by Charlotte Ekker Wiggins)

“Charlotte, help. I was given three yellow mums for my birthday and I can’t tell if they are still alive. They look dead to me. How do I tell?” — Cecily

Mum Still Alive?

Hi Cecily, lucky you! If you have been watering the gift mums all along as the flowers fade, your plants may still be alive, even if they look dead.

Florist chrysanthemums are grown in greenhouses with artificial lights and stimulation. They are a little harder to transfer to a garden since they have never lived outside. Garden mums, those grown by nurseries, are easier to make the transition since they were grown in natural conditions.

Regardless, the key to determine if your mums are still alive is to “peek” into the bottom of the plant to spot any new growth. The yellow mum at the top has been planted in my garden for a good month now. Here is the bottom of the mum plant:

New growth in the bottom center is a good indication your mum is still alive. (Photo by Charlotte Ekker Wiggins)

New growth in the bottom center is a good indication your mum is still alive. (Photo by Charlotte Ekker Wiggins)

Those tiny green leaves are the start of a new mum plant and a sure sign the plant is still alive and growing. Leave the dead stems and flowers to protect the seedlings through winter.

Here is another mum where the flowers and stems appear to be dead. What do you think, is this mum still alive?

A mum where both the flowers and stems are dry and appear dead. (Photo by Charlotte Ekker Wiggins)

A mum where both the flowers and stems are dry and appear dead. (Photo by Charlotte Ekker Wiggins)

After planting your mums in the garden, make sure to water a couple of times a month through winter. The water will help keep the roots alive and get established.

I wouldn’t have bet on that mum plant until I gently pushed the stems side and looked at the bottom. The new starts are not very big so look closely and at the stem bottom.

Bottom of the dry mum has new growth in the center. (Photo by Charlotte Ekker Wiggins)

Bottom of the dry mum has new growth in the center. (Photo by Charlotte Ekker Wiggins)

Once the mums are established in your garden, they will come back on their own for several years.

Here is an established pink mum with the colors of our Pink Sleeping Cats Quilt. I didn’t trim back to the round shape earlier this year so that I could easily enjoy the flowers on longer stems as cut flowers. We’ve already had several hard frosts in mid-Missouri so the plant is looking a little worse for wear.

This pink mum has been growing in a flower bed for 3 years now. Is it still alive? (Photo by Charlotte Ekker Wiggins)

This pink mum has been growing in a flower bed for 3 years now. Is it still alive? (Photo by Charlotte Ekker Wiggins)

Checking the pink mum’s center, though, is what I like to see, tiny starts of next year’s plant already showing their little leaf tips.

Sure enough, little mum starts are at the bottom of the plant. (Photo by Charlotte Ekker Wiggins)

Sure enough, little mum starts are at the bottom of the plant. (Photo by Charlotte Ekker Wiggins)

It did cross my mind that it may appear odd for someone to be going from mum to mum, peering into the plant and laughing. It’s one of my favorite mid-winter past times on a sunny day when I am ready for spring. Seeing those tiny new leaves are a promise of another growing season ahead.

So what do you see when you peek at your mums centers?

Charlotte

Updating Door Wreath

My artificial berry door wreath updated with cedar boughs. (Photo by Charlotte Ekker Wiggins)

My artificial berry door wreath updated with cedar boughs. (Photo by Charlotte Ekker Wiggins)

“Love your grapevine wreath ideas. I have an old fake berry wreath my mother gave me. How can I update that artificial wreath? It’s not a grapevine….” Cindy

Updating Door Wreath

Hi Cindy, I have a couple of favorite non-grapevine wreaths as well. The one I see the most is the wreath on my front door which has a variety of fake burgundy to yellow berries. I saw similar artificial berry wreaths at our local craft store.

To customize it, I kept things simple by adding a little bee skep ornament in the center and a homemade sign to celebrate my bees. I snuck in a few dried wild indigo leaves, those are the grey ones. Which reminds me, most have fallen out by now so I need to pick up a few more the next time I go walking.

I keep this wreath simple because the action of opening and closing the front door can easily knock things I weave into it.

Cedar trees produce pretty blue berries in the fall. (Photo by Charlotte Ekker Wiggins)

Cedar trees produce pretty blue berries in the fall. (Photo by Charlotte Ekker Wiggins)

The easiest addition, though, by far was adding fresh cedar boughs with blue berries. I cut several the same length and pushed them in a circle around the artificial door wreath. Having something fresh and contrasting easily and quickly nicely updated the door wreath.

Fresh cedar boughs add color add life to my artificial door wreath. (Photo by Charlotte Ekker Wiggins)

Fresh cedar boughs add color add life to my artificial door wreath. (Photo by Charlotte Ekker Wiggins)

Curious to see how these cedar boughs would change my large bluebird wall wreath, I snuck a few cedar tree boughs into that grapevine wreath.

The blue berries on the cedar boughs help to balance the brightness of the orange pyracantha berries. Can you tell I love updating the wreaths with interesting shapes and colors?

Cedar boughs with blue berries in my main entrance grapevine wreath. (Photo by Charlotte Ekker Wiggins)

Cedar boughs with blue berries in my main entrance grapevine wreath. (Photo by Charlotte Ekker Wiggins)

The more I add to this large grapevine wreath, the more my bluebird painted gourd seems to stand out. The blue accents of the cedar bough berries pulled it all together.

Good thing it’s snowing, I think I may be running out of space to add more to the grapevine wreath.

Blue berry cedar boughs mixed in with other dried flowers in my grapevine wreath. (Photo by Charlotte Ekker Wiggins)

Blue berry cedar boughs mixed in with other dried flowers in my grapevine wreath. (Photo by Charlotte Ekker Wiggins)

Once the cedar dries out, the boughs will retain some of their green color.

You should be able to find cedar boughs in your own backyard. This time of year, fresh wreaths will also soon be available. You could cut evergreens out of those wreaths if you can’t find any in your own garden.

Charlotte

Difference Between Quilt and Lap Quilt

Custom personalized photo lap quilt covers the top of a queen size bed. (Photo by Charlotte Ekker Wiggins)

Custom personalized photo lap quilt covers the top of a queen size bed. (Photo by Charlotte Ekker Wiggins)

“…love your quilts. What is the difference between a regular size quilt and a lap quilt?” — Suzanne

Difference Between Quilt and Lap Quilt

Hi Suzanne,

Handmade quilts come in a wide range of sizes, especially the vintage quilts that recycled clothing and other household items. At that time, handmade quilts were made without regard to any standard sizing.

Today’s handmade quilts do have some standards. Standard full quilts are 86 inches by 86 inches; queen size quilts, the most sold size, is 90 inches by 90 inches. We make our custom handmade quilts with a little more mattress cover at 95 inches by 95 inches. By comparison, a standard lap quilt is 50 inches by 60 inches, a smaller size that can still feature the full quilt design.

Lap quilts are wonderful to curl up in because they are just the right size to cover legs and still not have to wrestle a ton of fabric to get out of it.

Lap quilts also make excellent quilted wall hangings because they can easily have tabs added to the back. Some are manufactured with the tabs, others may need a quilt hangar to turn them into a wall hanging.

This all cotton Cat Mischief Lap Quilt would make a charming quilted wall hanging. (Photo by Charlotte Ekker Wiggins)

This all cotton Cat Mischief Lap Quilt would make a charming quilted wall hanging. (Photo by Charlotte Ekker Wiggins)

Wall hangings are also practical, then can help insulate a cold room wall.

If you are a beginning quilter, it will be better to start by making a lap quilt as you learn the basic quilting principles. You will finish this project sooner than a full size quilt and hopefully be excited enough to tackle your next one.

I have lap quilts over the back of sofas and easy chairs, they make an area inviting!

Charlotte


Cat Baskets

Measuring a curled up cat in a basket has its challenges. (Photo by Charlotte Ekker Wiggins)

Measuring a curled up cat in a basket has its challenges. (Photo by Charlotte Ekker Wiggins)

“…I saw you measuring some baskets. Do you really pick out the baskets for your cats or do they decide which ones they like?” — Julie

Cat Baskets

Hi Julie,

A little of both although in the last couple of years I am getting pickier about the baskets I bring into the house.

When I first started using baskets to hold magazines and books, I selected rectangular ones so I could fit two magazines side by side. I had them placed next to chairs and sofas to make the contents easier to reach.

With a little more creativity, I now have them on and under furniture, which means my cats like to use them as well.

If you are starting your basket shopping, measure the cat curled up that you think will use a basket. Having that measurement will give you a better idea of what basket size you need.

The basket being used in the photo is the same size as another basket another cat uses to sleep in every night so it was a pretty safe bet.

Looks like this basket is being as cat toy storage. (Photo by Charlotte Ekker Wiggins)

Looks like this basket is being as cat toy storage. (Photo by Charlotte Ekker Wiggins)

If I run across another possible basket, though, I do measure it before bringing it home. I also note the handle space to ensure there is enough clearance for entering and exiting by feline visitors.

To help keep baskets clean, I line the bottoms with an extra soft kitchen towel so I can wash and replace them every week.

Now even after all of this, if you have two baskets and you decide to use one for magazines, it’s been my experience that will be the basket the cat will want.

It’s a feline thing.

Charlotte


How Long Do Wildflowers Bouquets Last

This bouquet of mostly wildflowers has been on my table for two weeks. (Photo by Charlotte Ekker Wiggins)

This bouquet of mostly wildflowers has been on my table for two weeks. (Photo by Charlotte Ekker Wiggins)

“…You’ve inspired me to pick more wildflowers and bring them inside to enjoy. How long do wildflowers last as cut flowers?” - Emily

How Long Do Wildflowers Bouquets Last

Hi Emily,

So glad you are going to enjoy more wildflowers inside, I truly can’t imagine not having fresh flowers around every day.

This is the mostly wildflowers bouquet sitting on my den table, I have had it for about two weeks and have refreshed the water every other day. I also cut off the bottom of the flower stems to ensure they are taking up water.

It is hard to say how long the wildflowers will last because it depends on several factors:

  1. How early in the blooming process did you pick them. When I cut flowers in bud form or just blooming, they tend to last longer.

  2. Some wildflowers work better as cut flowers than others. The white Beards Tongue is a hardy cut flower while the Ox-Eye Daisies fade much faster.

  3. Some flowers are not easy to mix with others. Daffodils, for example, have a toxin that kills other flowers mixed in with them so they have to be kept in separate water for a couple of days until the toxins drain before mixing.

  4. It’s better to pick the wildflowers early morning so you are getting them when they look the best and heat hasn’t deprived them of water.

    My suggestion is pick wildflowers from your garden and get to know which ones are better cut flowers. For example, although I love self heal, a pretty purple mint that is native to Missouri, it does not make a long lasting cut flower. I still will cut a few and include them in bouquets knowing full well I will need to pull them out after a couple of days.

Can you identify the flowers in this bouquet?

Orange Oriental Lily; Beards Tongue; Ox-eye Daisies; Speedwell and Dame’s Rocket. The Oriental lilies and Speedwell are perennials. The rest are considered Missouri wildflowers.

The Dame’s Rocket is a surprise, they have been blooming since end of March in my garden and these little flower sprigs are the last vestiges of their bloom.

Enjoy, Emily!

Charlotte