Fresh Picked Early Daffodils

After 3 days from being picked, the early daffodils are starting to bloom. (Photo by Charlotte Ekker Wiggins)

After 3 days from being picked, the early daffodils are starting to bloom. (Photo by Charlotte Ekker Wiggins)

Fresh Picked Early Daffodil

The forecast was for record-breaking cold weather with a dollop of snow after the forecasters said we would have an early spring in mid-Missouri, USA. Greenery was starting to pop up in my garden including one of my favorite spring flowers, the early, old-fashioned daffodils sprinkled through my one-acre hillside garden.

These daffodils have been rescued from several old house sites with the owner’s permission. They are not big, or fancy, their claim to my heart is that they are the first daffodils to bloom in spring, a promise of more flowers to come.

When I heard the forecast, I headed outside to see if there were any daffodils getting ready to bloom. Although they can often make it through snow, I wasn’t so sure about record cold temperatures so I picked a few already in bud form.

Once inside, I trimmed their stems to the same length and placed them in a 5-inch porcelain flower vase that easily fits on a tray on my den coffee table.

These are the early daffodils right after they were picked. (Photo by Charlotte Ekker Wiggins)

These are the early daffodils right after they were picked. (Photo by Charlotte Ekker Wiggins)

After the first couple of days inside, the early daffodil buds started to show progress as the sweet yellow flowers made it to the blooming stage.

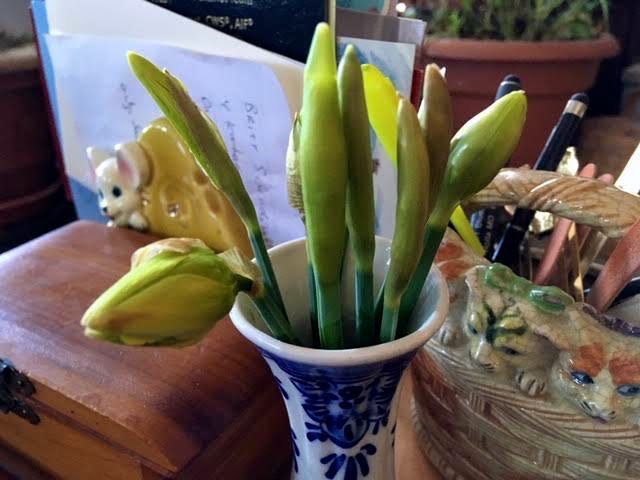
I have two kinds of very old-fashioned daffodils in the vase. One is the small, early daffodils and the second is a double daffodil no longer available on the market. The double daffodils are not as reliable as cut flowers, you can see the one on the bottom left is drying up faster than the one in the center. Although I know the double ones sometimes don’t develop as cut flowers, I included these two in case they made it.

Second day of sitting in my tiny flower vase. (Photo by Charlotte Ekker Wiggins)

Second day of sitting in my tiny flower vase. (Photo by Charlotte Ekker Wiggins)

I also gave a friend a tiny bouquet of these early daffodil buds for her kitchen table. She said they are all open now and greatly cheered her up during this last winter storm.

There’s a third different kind of daffodil getting ready to bloom. (Photo by Charlotte Ekker Wiggins)

There’s a third different kind of daffodil getting ready to bloom. (Photo by Charlotte Ekker Wiggins)

Wait, looks like I have a third kind of daffodil getting ready to bloom with the early daffodils. See the white daffodil bud?

Fun to try to guess what color this will be once it blooms.
Early daffodils are one of those wonderful spring blessings like in this spring blessings lap quilt throw, a sign that cold weather should be almost over and a promise of warm days in the garden ahead.

Charlotte

How to Make Dried Wreaths

Add dried leaves to a wreath shape to quickly fill it out. (Photo by Charlotte Ekker Wiggins)

Add dried leaves to a wreath shape to quickly fill it out. (Photo by Charlotte Ekker Wiggins)

How to Make Dried Wreaths

Sometimes the prices of dried wreaths stun me but then I have been making my own for years. Whether you are making them for yourself or as a housewarming and wedding gift, or just for yourself as home decor, dried wreaths are easy to make and can be easily be updated every year.

The most challenging part is finding the dried grasses, leaves, flowers and seeds that make each wreath interesting. Great excuse to take walks in your neighborhood, and through your garden, and look at your plants with a new eye.

For example, Autumn Sedum “Joy” has interesting flowers that, once dry, make great additions to dried wreaths. When they are snow-covered, I think of them as “snow flowers.”

Autumn “Joy” Sedum dried flowers covered in snow. (Photo by Charlotte Ekker Wiggins)

Autumn “Joy” Sedum dried flowers covered in snow. (Photo by Charlotte Ekker Wiggins)

Another popular seed pod for dried wreaths are water lotus pods. Water lotus are native to Missouri.

Water lotus seed pods make elegant additions to dried wreaths. (Photo by Charlotte Ekker Wiggins)

Water lotus seed pods make elegant additions to dried wreaths. (Photo by Charlotte Ekker Wiggins)

Water lotus pods add an interesting dimension, too. They are expensive to buy at craft stores but grow free in your pond if you have the flowers.

Wild grapevine wreaths are available for sale at craft stores or may be growing in your own backyard. (Photo by Charlotte Ekker Wiggins)

Wild grapevine wreaths are available for sale at craft stores or may be growing in your own backyard. (Photo by Charlotte Ekker Wiggins)

Select a Good Wreath Foundation

You can make your own base wreath or buy one, whichever is easier. Honeysuckle makes a good basic wreath as does kudzu and English ivy. And who doesn’t need another reason to pull those two invasive plants out of the garden?!

If you check thrift stores and yard sales, you can also find a wide range of basic wreaths that you can use, from plain wire frames to wild grapevine wreaths, which I use because I have wild grape vines growing in my limestone hillside garden.

I wait until fall and the leaves are off to collect the vines and wind them into the wreath shapes. Sometimes I leave the dried leaves on for interest but then don’t last long.

Make sure you have a solid way to hang the wreath either by adding a wire at the top or using something similar to hold the vine bundle together so you can easily hang it.

Add Favorite Dried Items

You want to have some basic materials to start adding to your wreath. In one of my grape vine wreaths, a family member sent me a ladybug welcome sign that I added in the center. You can find signs at most craft stores. Farmer’s markets also have artists with signs who can also make custom signs for you. Visit Etsy.com and Pinterest.com for inspiration if you want to make your own.

Acorns still on their oak tree branches make interesting wreath additions. (Photo by Charlotte Ekker Wiggins)

Acorns still on their oak tree branches make interesting wreath additions. (Photo by Charlotte Ekker Wiggins)

You can find a variety of items in your own backyard, starting with dry leaves and seeds, such as acorns.

Local wildflowers are a wonderful source of inspiration and wreath material. Wild yellow indigo flowers along one of my walking paths leave a lovely grey foliage that became the basis for this first dried wreath. The red sumac flowers and yellowish panicle hydrangeas add some color and interest with different shapes. The pop of green is from holly bush pruning. The misty purple moving up the wreath center is from Russian sage trimmings.

I don’t add all of these items at once, I embellish through the season when I find something that will add a pop of color and interest.

This large wild grape vine wreath hangs from a dowel in the mortar. (Photo by Charlotte Ekker Wiggins)

This large wild grape vine wreath hangs from a dowel in the mortar. (Photo by Charlotte Ekker Wiggins)

You can also add other items to these wreaths. The wild grape vine wreath at the front of my house has a little bluebird birdhouse I picked up for $1 because it was missing a beak and part of a painted eye.

With a little patience, I repainted the eye and added a new orange beak. If I can find my fishing line that would work better to hang the birdhouse from the top of the wreath than the grey string I am currently using.

Periodically I do find birds checking out the birdhouse and that’s fine by me. If it gets used, I will clean it out at the end of the season and hang it back up.

Other wreath additives could be pine cones and dried fruits. One year I added dried orange peels. Another year I had some interesting grasses that were soon consumed by local deer.

This wild grape vine wreath welcomes visitors to my house. (Photo by Charlotte Ekker Wiggins)

This wild grape vine wreath welcomes visitors to my house. (Photo by Charlotte Ekker Wiggins)

The bluebird dried wreath also has some trimmed Russian sage for a pop of green. This is the first year I added the Russian sage, will be interesting to see how long that stays green and how long it lasts. I suspect my local deer herd will yank it out as they taste test the greens.

If you don’t have wildlife nibbling on your wreaths, you can spray them with a clear spray to preserve them once a year. I don’t because of the wildlife visitors but I find the wreaths last a good long while without the extra preservation. They are located under eaves and out of the elements.

No time to gather dried flowers?

Dried leaves tucked into this wreath is as simple as it gets. (Photo by Charlotte Ekker Wiggins)

Dried leaves tucked into this wreath is as simple as it gets. (Photo by Charlotte Ekker Wiggins)

Here’s very simple inspiration to make a quick dried door wreath. Find a basic wreath shape and color you like, then add a couple of dried items.

For this door wreath I found the basic berry wreath at a local thrift store for $1. I dded the grey wild indigo leaves and a few clusters of dried oak leaves from my garden. The contrasting colors were enough to make the original red and orange berry base wreath look finished.

Weeks later, I found the little woven bee skep at a thrift store for a quarter and made the center sign out of a painted paint stirrer that comes with paint cans. The sign took the most time; everything else was a matter of minutes.

Nature sometimes lends a hand, too! (Photo by Charlotte Ekker Wiggins)

Nature sometimes lends a hand, too! (Photo by Charlotte Ekker Wiggins)

Dried wreaths warm up doors and entryways, last nicely through cold winters and can easily be updated every year. They also make nice housewarming and wedding gifts. Half the fun is looking for new things to add to them!

Charlotte


Making Mug Rugs

I saw several versions of "mug rugs" at Christmas parties this year and can't wait to come up with my own version. I'm thinking I could make a little pouch on the right where a favorite spoon could fit in!

One of the ladies who made this one said they were very popular this year at quilt guilds. She also said they are "very easy" to make so you still have time if you want to make some for Christmas gifts.

Mug rugs are quilted 8x10 inch miniature quilts so that a mug can be placed on one side and a muffin, or cookie, on the other.

This one was made out a printed Christmas fabric and finished with binding, just as you would a quilt.

 Machine quilting to make a little design can be seen on the back. This picture is a little out of focus but it still gives you the idea:

I also saw another version where a little 3x3 inch flat cotton envelope with cinammon was stitched inside on the mug side. Once heat hits the spice, the aroma is released.

If you make some, remember to add a little card to explain just what this is:

 Sweet little gift idea any day of the year!

Charlotte